If you’re a software product designer or product manager, it’s time to make friends with that intimidating black box called the terminal. This application is becoming essential when utilizing LLMs and AI assistants beyond the chat prompt. Think of all those times Claude tells you to “run this command in your terminal” and you suddenly feel like you’re messing about with the innards of your computer. Beyond AI tools, terminal fluency will make you more productive and informed when working with your developer counterparts.
In this article, I’m going to break down what you need to know as a product team member and give you what I believe is enough of a foundation to confidently navigate the command line without accidentally reformatting your hard drive.
What is the Terminal?
The Terminal (sometimes referred to as the terminal emulator) is a program that simulates a text-based command-line interface, allowing users to interact directly with the operating system through typed commands. It exists to provide powerful, scriptable control over the system without graphical interfaces getting in the way. This enables automation, remote access, and efficient system management for technical users.
Most non-developers get very intimidated by this commonly used application because is is just not used often by other professionals. There is an incredibly large set of commands, tasks and automations you can run which makes it difficult to know where to get started. Not to worry, this tutorial will give you a solid launching pad.
Which Terminal Application Should I Use?
If you are on a Mac, the default terminal application that comes bundled with MacOS will be just fine to get you started. There are lots of terminal emulators out there and I encourage you to take a look at some of them once you are comfortable.
On Windows, again, I suggest you start with the bundled Windows Terminal. I use this every day and find it to suit my needs. However it has caveats. First, the “shell” is different, as it uses Microsoft’s own Powershell to run commands. These commands are very different and only run on Microsoft architecture, and since we have decided not to get into shells here, there are alternatives. What you really want to do if you are on Windows is activate Windows Subsystem for Linux or WSL. Especially if you plan on doing web development or rapid prototyping.
If you don’t want to go through all that noise at the moment. Download Git Bash and you will have what you need to get started on Windows.
For Linux users, I would expect you do not need me to suggest a Terminal application.
Fundamental Commands & Patterns
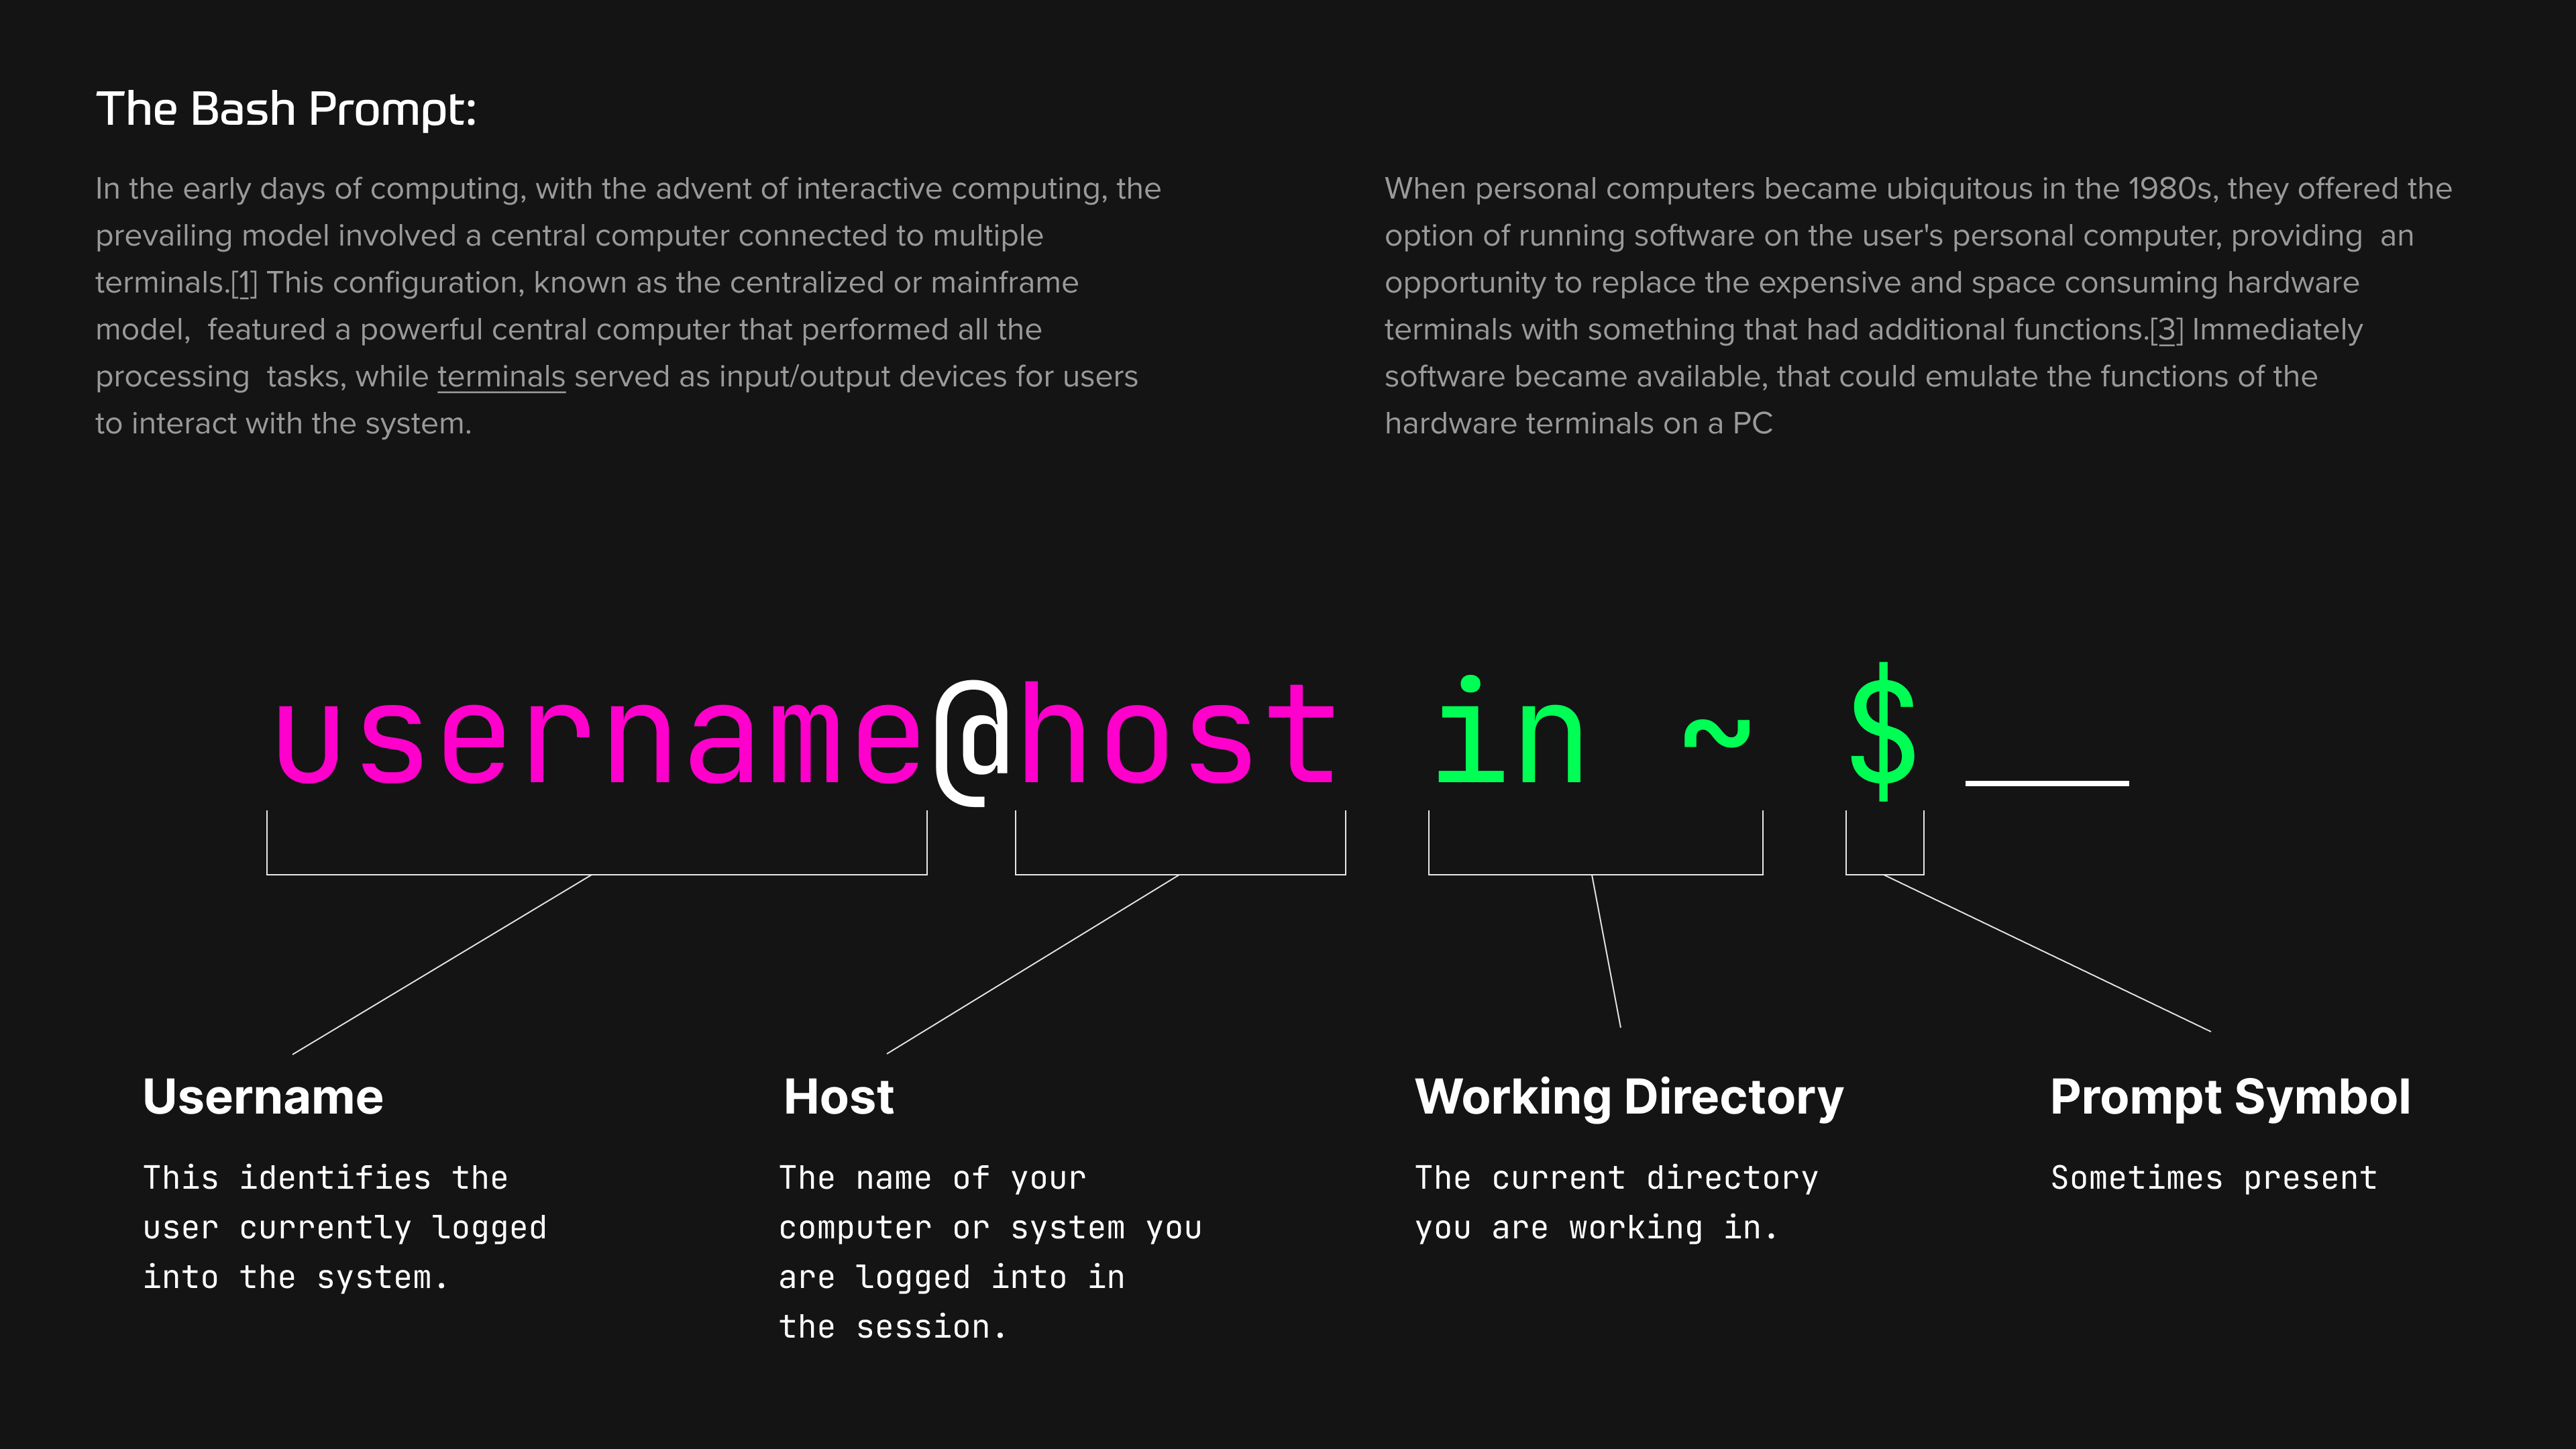
When you launch your terminal you are launching what is sometimes referred to as a ‘session’. This is only important so you understand how some of the terminology is used in relation to the commands you run. You can have multiple sessions (instances of the terminal) running at once. What you do in one session may not affect the other depending on what you are doing.
Key Commands
Using the terminal is like any other application, since it gets most of it’s input from the key commands we will start there and work our way more functional commands.
| Command | Description |
|---|---|
Up Arrow |
Will show the last command you entered (command history) |
Down Arrow |
Will show the next command you entered (command history) |
Left Arrow |
Move the cursor to the left |
Right Arrow |
Move the cursor the the right |
Ctrl + A |
Will move the cursor to the beginning of a the line |
Ctrl + E |
Will move the cursor to the end of the line |
Ctrl + Left/Right Arrow |
Move the cursor from word to word of a line |
Ctrl + C |
Cancels the command or currently running process in the terminal session |
Ctrl + R |
Search command history |
Ctrl + L |
Clears the terminal screen but does not clear the session |
Manual Command and Help
One of the advantages of the terminal is it’s longevity, it is probably the most prolific and has the longest lifespan of any other user facing application on your computer. This pedigree comes with the benefit of being around before the internet was a mainstream playground. Manuals for the commands needed to come with the terminal program itself so users had a guide. I highly suggest you go down the rabbit hole of reading the man pages for some of the commands we will highlight below.
If you are a Mac or Linux user, you can use the man command to show the manual of any command used in the terminal.
man [command] # i.e. man ls
Most, but not all commands used in the terminal also have a --help option that will display common usage and examples. However, this is not always the case and is not available for most system level commands like ls and cd.
For those of you using GitBash, the man command does not come packaged with the terminal emulator. You can however use the --help option to get information about the commands.
mkdir --help
While in the manual you can navigate using the Up/Down Arrow keys. You exit by typing q for quit.
The pwd Command
This is a simple command but one that always comes in handy for beginners. The Path To Working Directory command or pwd outputs your current position within the file system.
pwd # will output something like '/Users/your_user_name'
File System Navigation
Now we are hitting some of the useful commands and their flags/options that will help us get around the system. A flag or an option is usually preceded with a - or --.
| Command | Description |
|---|---|
ls |
Lists the contents of the current directory |
ls -a |
Lists ALL of the contents of the current directory (including . files) |
ls -l |
Lists ALL the contents with other information including permissions |
ls -r |
Will list the content in reverse order |
cd |
This will change directory used like: cd /path/to/directory |
cd .. |
This will take you one level up to the parent directory |
cd ../.. |
This will take you up the tree two directories |
cd - |
This will take you to the PREVIOUS directory which may not be the parent |
cd ~ |
Will take you to your home directory(on most systems simply typing cd alone will take you back to your home directory) |
You can use the command together to get information about the directory:
ls -al # This will output a list of ALL files in the directory including additional information.
Modifying Files
Now that you have some information about navigating the file system using the terminal, we can move on to creating and modifying files.
| Command | Description |
|---|---|
mkdir [dir_name] |
Creates a directory |
touch [file_name] |
Creates a fiile |
cp [file_name] [dir_name] |
Copies the file to the directory |
mv [file_name] [dir_name] |
Moves the file to the directory |
mv [dir_name] [dir_name] |
Moves the directory to the directory |
mv [file_name] [file_name] |
Renames the file |
rm [file_name] |
Removes the file |
rmdr [dir_name] |
Removes the directory |
rmdr -rf [dir_name] |
Removes the directory and ALL of its contents |
Pro tip: When using the cp or mv command you can copy and move files in batches if they have a common suffix or prefix. For example if you just wanted to copy or move all of the .doc files you have in a directory you would do something like this:
cp *.doc ~/Documents # This will copy all .doc files to the target directory
You can also type two commands in the same line using the Logical AND operator && like so:
mkdir mydirectory && cd mydirectory # creates a directory then moves you to it
The cat command
The cat command is like the Swiss Army knife of file operations—it can create files, but it’s most helpful for quickly peeking at file contents without opening a full editor.
cat [file_name] # will display the contents of the file
Use the cat command with > to create a file:
cat > myfile_01.txt
Use the cat command with >> to append contents from one file to another:
cat myfile_01.txt >> myfile_02.txt
The cat command is incredibly powerful and can be used in many productive ways (serious Unix wizards can do things with cat that would make your head spin), but for the sake of this article, we’ll keep it simple and practical.
The nano command
Nano is a text editor that lives entirely in the terminal—think of it as Notepad’s command-line cousin. This is useful when you need to quickly edit file contents without launching a full GUI application. Most elite coders prefer vim, which is feature-rich but has a learning curve steeper than a San Francisco street. Nano is perfect for simple, quick edits without the existential crisis of trying to exit vim.
To open a file in Nano, use the nano command:
nano file_name.txt
This will put your terminal into the nano app. You can exit by hitting Ctrl + X—mercifully, nano actually tells you how to exit right there on the screen, unlike certain other editors that shall remain nameless.
The find command
The find command does exactly what you’d expect—it finds stuff. It’s like having a bloodhound for your file system, capable of tracking down files and directories based on various criteria.
To use the find command in its simplest form:
find [dir_name] -name [file_name]
You can find files that match patterns using wildcards. Let’s say you want to find all files with a specific pattern—maybe all those backup files you created with creative naming schemes:
find [dir_name] -name "*-name.txt"
To find files and directories starting from your current location, use the . (which represents “here”):
find . -name [file_name.txt]
The grep command
The grep command deserves its own graduate-level course, but it’s too useful not to mention. Think of grep as the “Find in Files” function of your IDE, but supercharged and running on pure caffeine. It allows you to search for text patterns in files—incredibly handy when you need to hunt down that specific error in a log file that’s longer than a George R.R. Martin novel.
grep [search_term] [file_name]
grep comes with helpful options that make searching more civilized. For example, you might want to see line numbers so you can actually find what you’re looking for:
grep -n [search_term] [file_name]
Or maybe you need to be case insensitive (because who has time to remember if that error message was “Error” or “ERROR”):
grep -i [search_term] [file_name]
Or perhaps you need to search multiple files simultaneously (because problems never confine themselves to just one file):
grep -i [search_term] [file_name] [file_name] [file_name]
There’s so much more you can do with grep (regex patterns, context lines, recursive directory searches), but let’s not turn this into a computer science thesis just yet.
The head and tail Commands
These two commands are the “preview” buttons of the terminal world. Useful when you want to peek at either the beginning or end of a file without opening the whole thing. This is especially helpful when monitoring log files or checking what’s been added recently. Each command outputs ten lines by default, but you can customize this easily.
First, to output the first ten lines of a file:
head [file_name]
To output the last ten lines of a file:
tail [file_name]
You can modify the amount of lines output by using the -n flag along with the number of lines you want to output:
tail -n 20 [file_name]
I use tail much more frequently for reading log files (because problems usually show up at the end), but both commands are incredibly useful for quick file inspection.
Conclusion
The commands we’ve covered here represent about 80% of what you’ll need for day-to-day product work involving the terminal. You can now navigate file systems, manipulate files, search for content, and—most importantly—not panic when a developer asks you to “just run this quick command.”
Remember, the terminal isn’t trying to be your enemy; it’s just a tool that values precision over hand-holding. Every developer you work with learned these same commands at some point, probably while making the same “I hope I don’t break anything” face you’re making right now.
The beauty of terminal skills is that they’re transferable across projects, companies, and even decades. These commands have been around since before the iPhone existed and will probably outlive whatever JavaScript framework is trendy next week. Time invested in terminal literacy is time well spent.
As you get more comfortable, you’ll start to appreciate the speed and precision of command-line operations. What used to take several clicks and menu navigations can now be accomplished with a single command. You might even find yourself preferring the terminal for certain tasks—and when that happens, you’ll officially be one of us.
Additional Resources
For continued learning and reference, check out these excellent resources:
Terminal Cheat Sheet - Use this Terminal cheat sheet as a reference. All the commands in this tutorial are covered.
CommandLineFu - A community-driven repository of command-line gems and one-liners. Perfect for discovering clever solutions and expanding your terminal vocabulary beyond the basics.
Terminal Tutor - Interactive terminal tutorials that let you practice commands in a safe, guided environment. Great for hands-on learners who want to experiment without consequences.
Ubuntu Command Line for Beginners - A comprehensive tutorial that works on any Unix-like system (Mac, Linux, WSL). Excellent for systematic learning with clear explanations.
MDN Command Line Crash Course - Mozilla’s developer-focused guide to command line basics, particularly useful for understanding how terminal skills integrate with web development workflows.
Now go forth and command your computer with confidence—your future self (and your developer teammates) will thank you!